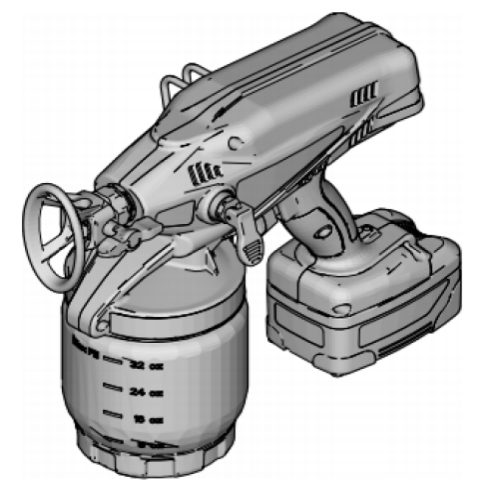
TrueCoat Plus Home Center - 258880

To avoid serious injury follow all warnings and instructions in the manual. Wear appropriate personal protective equipment.

Slow speed of movement.
Make sure material is compatible. See Reversible Tip Selection Chart, page 11.

Make sure compatible material is being used. See Reversible Tip Selection Chart, page 11.
Clean or replace Fine Finish Optimizer. See page 8.
Switch to compatible material.
Replace sprayer.

Move sprayer faster while spraying.
Move sprayer away from surface 10 in. (25 cm)
Release trigger when changing directions.
See Reversible Spray Tip Selection Chart, page 11.
Replace spray tip. See Install Spray Tip/Guard Assembly, page 11.
Move sprayer away from surface 10 in. (25 cm)
Install different size spray tip. See Reversible Spray Tip Selection Chart, page 11.
See Install Spray Tip/Guard Assembly, page 11.
Move sprayer closer to surface.
Install different size spray tip. See Reversible Spray Tip Selection Chart, page 11.
See Shutdown and Cleaning, page 14.
Clean or replace spray tip filter. See page 13.
See Install Spray Tip/Guard Assembly, page 11.
Replace spray tip/guard assembly.
Sprayer is worn out.
Replace sprayer.
Fine Finish Optimizer is installed while using an incompatible material. Make sure compatible material is being used. See Reversible Tip Selection Chart, page 11.
Sprayer is worn out. Replace sprayer.
Disengage trigger lock. See page 6.
Replace with charged battery and place old battery in charger, or allow battery to warm up.
Allow battery to cool.
Install battery or replace.
Prime the pump. See Starting a new Job (or Refilling the Cup), page 10. If sprayer fails to prime, follow Inlet Valve Cleaning (page 22) and/or Alternate Priming Method (page 21).
Put valve DOWN to spray position.
Make sure Suction Tube is properly installed.
Use a pencil or thin rod to lightly push on inlet valve to make sure it moves up and down freely. See Starting a new Job (or Refilling the Cup), page 10.
Replace flexible suction tube o-rings.
Turn tip to SPRAY position.
See Unclogging Tip/Guard Assembly, page 13.
See Shutdown and Cleaning, page 14.
Make sure cup is filled with material. Do not tilt the cup too far. Prime the pump. See Starting a new Job (or Refilling the Cup), page 10.
Refill material cup with material.
Remove and clean tip filter. See Unclogging Tip/Guard Assembly, page 13.
Make sure compatible material is being used. See Reversible Tip Selection Chart, page 11.
Replace Suction Tube and o-rings.
Replace sprayer.
Replace sprayer.
See Unclogging Tip/Guard Assembly, page 13.
Rotate spray tip to SPRAY position.
See Reversible Tip Selection Chart, page 11.
Clean or replace filter. See page 13.
Clean or replace Suction Tube. See page 14.
Clean or replace Fine Finish Optimizer. See page 8.
Make sure compatible material is being used. See Reversible Tip Selection Chart, page 11.
Replace tip. See Install Tip/Guard Assembly, page 11.
Replace sprayer
Sprayer has reached its maximum life.
Replace sprayer.
Damaged battery.
Replace battery.
Sprayer is working properly.
The issue is resolved. Strain your paint to avoid further issues.
Flush the sprayer with hot soapy water or 100% mineral spirits.
If this still does not resolve the issue the fluid pump may need to be replaced.
You will need to create a Salesforce case to escalate the call to a Graco Tier II tech.
Please advise the customer they will be contacted back by a Tier II Technician
• Check to make sure that the cup is securely attached to the sprayer.
• Make sure there is an "O" ring on the inlet of the sprayer.
• Check to make sure all of the air has been pushed out of the flexliner before spraying.
• Make sure the VacuValve is closed tightly.
There is an air leak.
• Check to make sure that the cup is securely attached to the sprayer.
• Make sure there is an "O" ring on the inlet of the sprayer.
• Check to make sure all of the air has been pushed out of the flexliner before spraying.
• Make sure the VacuValve is closed tightly.
Fluid pump may need to be replaced.
You will need to create a Salesforce case to escalate the call to a Graco tier II tech.
Please advise the customer they will be contacted back by a Tier II Technician.